Apache is one of the most popular web servers serving more than 30% percent of the websites. It is a free and open-source HTTP server. It comes packaged with tons of tools and features to run applications securely and with ease.
This tutorial describes how to set up SSL secure websites on the Apache Webserver.
NOTE: This tutorial is written and tested for Debian 9, 10, and 11 and Ubuntu 20.04.
Requirements.
To follow along with this guide, you will require to have the following:
- An Ubuntu/Debian installation
- A sudo or root permissions to install packages, modify configuration files, and restart services.
Installing Apache
If you do not have Apache installed, we need to install it. Enter the commands:
sudo apt update
sudo apt install apache2 openssl
Once you have the Apache Server installed, start the service and ensure everything is working correctly.
Enabling Mod_SSL and Mod_Rewrite Modules.
The next step is to enable the mod_ssl and mod_rewrite modules. To do this, we use the a2enmod script, which allows us to enable and disable modules in the apache configuration.
Use the commands as shown below:
sudo a2enmod ssl
sudo a2enmod rewrite
Enable .htaccess Override
The next step is to edit the Apache configuration and add an entry to allow the Apache default settings to override. Overriding settings are done in the .htaccess file located in the Apache root directory.
sudo vim /etc/apache2/apache2.confNavigate to the end of the file and add the following entry:
<Directory /var/www/html>
    AllowOverride ALL
</Directory>
Save and close the file.
Generating SSL Certificate
There are various ways to get a free SSL certificate. Tools such as certbot and SSL generators are great options.
However, in this guide, we will create a self-signed certificate using the OpenSSL utility.
Create a directory in the Apache configuration directory as:
sudo mkdir /etc/apache2/certsNavigate into the directory created above.
cd /etc/apache2/certsRun the OpenSSL utility to generate your self-signed certificate as provided in the command below:
sudo openssl req -new -newkey rsa:4096 -x509 -sha256 -days 365 -nodes -out apache.crt -keyout apache.key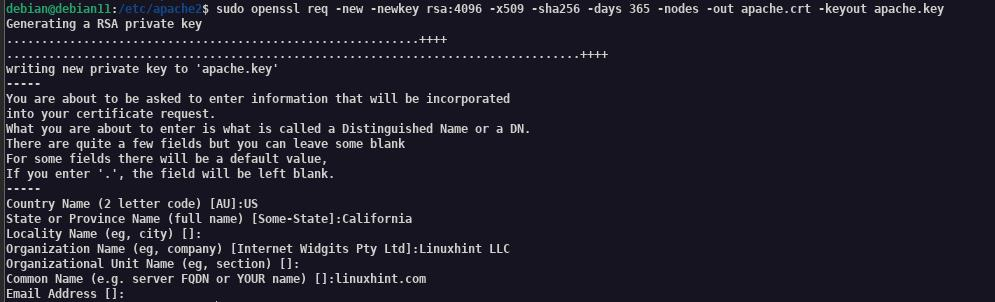
NOTE: You can provide any information in this process except Common Name. Ensure to give an IP address or hostname.
Once the process is completed successfully, you should have the apache.crt and apache.key in the certs directory.
Adding Cert to Apache Configuration
Add the certificate by editing the configuration file of the Apache default website.
sudo vim /etc/apache2/sites-enabled/000-default.confAdd a virtual host block on port 443 as shown:
<VirtualHost *:443>
    ServerAdmin webmaster@localhost
    DocumentRoot /var/www/html

    ErrorLog ${APACHE_LOG_DIR}/error.log
    CustomLog ${APACHE_LOG_DIR}/access.log combined

    SSLEngine on
    SSLCertificateFile /etc/apache2/certs/apache.crt
    SSLCertificateKeyFile /etc/apache2/certs/apache.key
</VirtualHost>
or
sudo a2ensite default-ssl.conf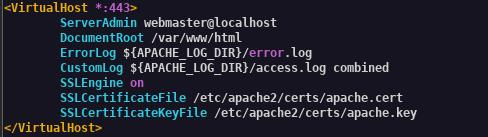
Redirecting to HTTPS.
In most cases, you will want to redirect users from no SSL endpoint to SSL. You do this by adding a Rewrite rule on the port 80 virtual hosts.
Add the entry as:
        RewriteEngine on
        RewriteCond %{HTTPS} !=on
        RewriteRule ^/?(.*) https://%{SERVER_NAME}/$1 [R=301,L]
NOTE: Ensure the Blocks above are under the port 80 virtual host.

Restart and Access Apache
Once everything above is configured, restart the Apache service and access your website via localhost.
You can view the certificate information by clicking on the lock icon in your browser.
ConclusionConclusion
In this guide, we covered how to enable and configure SSL on the Apache webserver.
「一键投喂 软糖/蛋糕/布丁/牛奶/冰阔乐!」
 e2c
e2c
(๑>ڡ<)☆谢谢老板~
使用微信扫描二维码完成支付